|
VPS plans, similarly to regular plans, are created with
Plan Creation Wizards. To create a VPS plan:
- Select Plan Creation Wizards in the Info menu.
- In the list of plans select Virtual Private Server plan wizard.
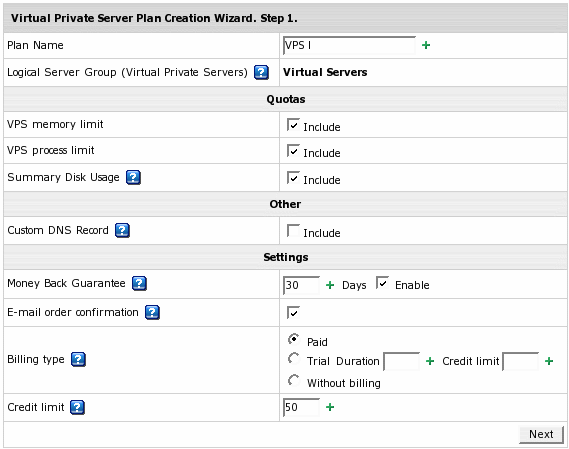
- On Step 1 of the wizard, give a name to the plan.

- Check necessary resources:
- Logical Server Group: users under this plan will be created on the servers
that belong to this logical servers group.
- Summary Disk Usage: mandatory resource. Users will be charged for the actual disk space used.
- VPS memory limit: check to restrict memory consumption by one VPS account.
- VPS process limit: check to set the maximum number of simultaneous system processes.
- Custom DNS Record: check to enable creating custom DNS records.
Click Next to proceed.
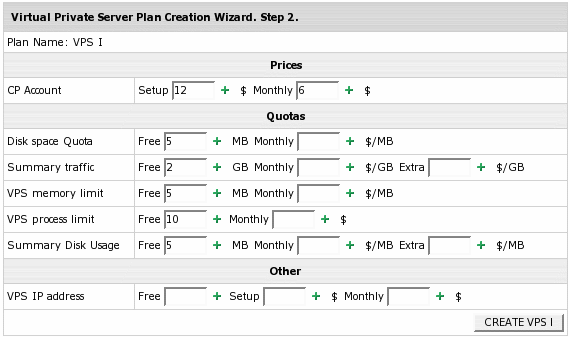
Step 2 shows the fields to enter free amount of resources necessary for the system to operate.
On this page, you set BASE prices used to calculate prices for ACTUAL BILLING PERIODS.

- Free: the amount of resources you grant users for free.
- Setup Fee: charged when the user creates a new H-Sphere account.
- Monthly Fee: charged once at the beginning of the billing period
for the difference between the quota and the free units.
- Usage Fee: charged at the end of each month of the billing period for
the prorated amount used up beyond the limit.
Click Create to complete plan creation.
Once the VPS plan is created, go back to Plans in the INFO menu and turn
the newly created plan ON for user signups.
If you want to create more payment periods for the plan, go to INFO ->
Plans -> Settings and add as many payment periods as you need.
Now that the plan is created and enabled, users can sign up under this plan and navigate
their control panels. It takes about 15 to 30 minutes to create a VPS resource,
so make sure to notify your users about this delay before they can start using VPS.
|